basic git concepts
| created on | October 28, 2023 |
| last modified on | May 6, 2026 |
overview of a git repo
The following picture shows the structure of a git repo and illustrates the flow of data between the repo’s components. The arrows also illustrate the workflow when working with git, with each arrow labeled with the corresponding git command (i.e. add for the command git add):
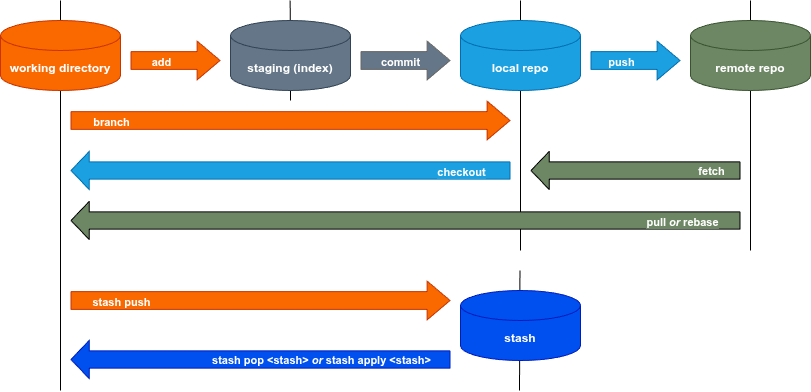
click on image to enlarge
x
working directory
The working directory holds the working copy of your project. These are the source code files you create and edit during working on a project. It might also contain directories for other stuff like dev tool configurations or binaries and class files compiled from the sources for test runs.
It’s everything but the directory. The directory holds the staging, the local repo and the stash.
staging (index)
Simply speaking, staging holds the next commit you plan to make (ignoring for now the role the index has during a merge conflict). New files created in the working directory are untracked until you add them to staging with . From then on, the file is tracked and considered part of the project, and displays if the file has been modified or deleted. If you delete a tracked file, during the next , git will remove the file from staging and un-track it prior to creating the commit. Thus, the file that has been deleted in your working directory will also no longer be in the next and subsequent commits.
A repo should only contain the source code of a project, along with configuration files or configuration templates that are not specific to any team member. Staging enables the exclusion of files in the working directory that should not end up in the repo by listing those files (or the filename pattern) in the file in the working directory. Examples of such files include:
- user specific configuration files for IDEs.
- directories that contain class files or object files and binaries compiled from the source code of the project.
- directories that contain files generated by developer tools like maven and gradle.
- backup files automatically generated by some editors, often identifiable by an editor-specific files suffix like or . For programming projects, such editors should be configured to not create backup files, as those files clutter the working directory and generally go against the whole point of using CVS. Nevertheless, excluding backup files in the file safeguards against backup files slipping into the repo by accident.
local repo
This is the repo on your machine. You commit a new version from staging to the local repo with .
git commits are compressed and de-duplicated. In a new commit, only a few files are changed, and most files stay the same. Git reuses the latter files, the de-duplication saves a lot of space. Files in a commit are frozen, nobody can change them, which is why it’s safe for a commit to depend on the previous commit.
remote repo
If you collaborate with a team, the remote repo is the hub for data exchange, that is, for making a new version you created available to other team members as well as getting new versions from your team-mates.
If you join a project, you clone the remote repo of the project with . This copies the current state of the remote repo to your machine. You now have the working directory, staging and the local repo matching the remote repo. (the stash is empty, until you use it). All files in your working directory are tracked.
Your local repo is downstream – the project’s content flowed from the remote repo (aka just the remote) to your local repo. If you make a new version available for others, you send that version upstream to the remote repo. This is why the remote is called Upstream. Again, if other team members update the remote, you can update your local repo with the new version on Upstream by pulling the new version in with i.e. .
stash
The stash is a place to conveniently store changes to your working directory if you don’t (yet) want to commit those changes, and you want to do a branch operation like checking out another branch, or pull in the latest changes from Upstream. Branch operations only work with a clean working directory (that is, the working directory resembles the last version of your local repo). Stashing changes in the working directory reverts those changes in the working directory.
There are some scenarios where the stash might be useful:
- You forgot something in your last commit and already started working on some other stuff in the same branch. You stash away the current changes with , add what you forgot to the last commit, and get the changes for ‘some other stuff’ back from the stash with . Don’t do this if you already pushed your last commit to Upstream!
- You work on a branch for some feature and work on some other stuff is urgent, like fixing a bug. You don’t want to commit the changes for the feature yet. You stash your changes with , checkout or create the branch for the urgent stuff, get that done, get back to the branch for the feature and get back to work on it after getting the changes from the stash with .
You can have several stashes, identified by a stash number. You can list all stashes, together with a short description of the branch they have been created from with .
Since branches in git are cheap and easy to manage, in almost all cases where you could apply a stash, a branch would do as well. It mainly comes down to personal preference.